SMTP Relay: Simplifying Email Delivery and Avoiding Spam
SMTP Relay Microsoft
While you are working or chilling out, email servers work tirelessly to make sure your emails get delivered. They don’t take days off and they are always there to help you. They are called Mail Transfer Agents or MTAs.
G Suite’s free SMTP relay service helps small enterprises send large volumes of transactional, promotional, newsletter, and other email messages without being flagged as spam.
SMTP Relay Gmail
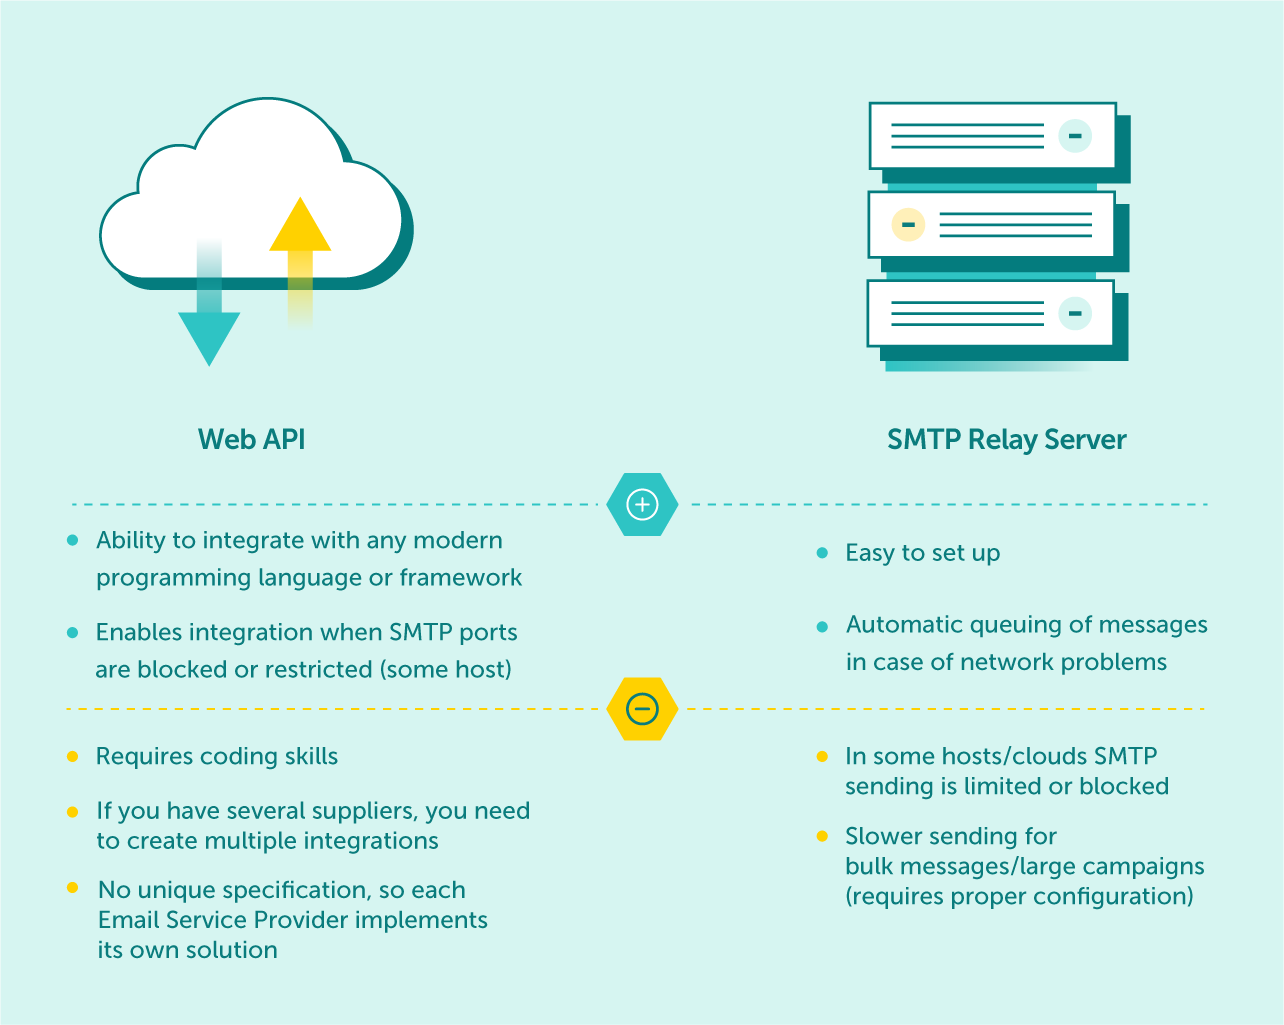
SMTP is the communication protocol that allows email messages to leave your Gmail account and go through various networks until they reach the intended recipient. You don’t have to worry about getting your emails mislabeled as spam or running up against Gmail’s maximum daily sending limits, because SMTP relay servers handle all of that for you.
Essentially, SMTP relay servers are like virtual post services: they work day and night to ensure that the emails you send get delivered right away. They don’t take days off or get sick, and they never go on strike. If you need to send large volumes of email, using an SMTP relay server is a smart move.
To set up a SMTP relay server, select the top-level organization from the left menu and click Configure. On the next page, select SMTP Relay Service. You can also add, edit or delete this setting by clicking the icon beside it. If you want to require authentication, check the Require SMTP Authentication box. Enter a name for the setting and choose whether you want it to apply to all users or only those in your organization. It may take up to 24 hours for your changes to take effect. If you don’t have a dedicated server, consider an SMTP relay service like MailerSend.
SMTP Relay O365
If your business requires you to send email in large volumes, an SMTP relay office service is essential. This will enable you to avoid getting your emails labeled as spam and will ensure that your emails are delivered in a timely manner. These services also provide real-time analytics and reporting tools, dedicated account management, and technical support.
SMTP Relay is an internet protocol that allows one server to deliver an email to another. The process is similar to sending a letter in the mail to someone who lives in your town – the local post office receives it and delivers it to that person without having to travel to another city. In addition, an SMTP relay allows a business to send messages to thousands of recipients without the need for a second server.
There are several ways to configure SMTP Relay in Microsoft Office 365. SMTP Authentication is the most secure option. It uses your email login to verify that the sending device or application is a trusted source. To set up this method, click on mail flow, then connectors and later, New. Then, select Authenticating sent email by verifying the IP address of the device or application. This will create a connector that can be used to communicate with the Exchange 365 mailbox, but does not require a connection to the underlying mail server.
SMTP Relay Microsoft
SMTP Relay Microsoft allows you to send large volumes of emails without worrying about being mislabeled as spam or exceeding email sending limits. Many email providers put restrictions on the number of different recipients that can be sent to in a single day, which can make it difficult for businesses and organizations to communicate with their audiences.
A SMTP Relay Server connection helps avoid possible Automation Process Service overload by distributing outgoing messages among several servers. This can help you reduce the chance of server outage and improve email delivery. It also helps ensure that e-mails are delivered in order.
To set up a SMTP relay, you must have a static unshared IP address or a range of addresses that aren’t shared with other users. The connecting device or application must also support SMTP Authentication. Using this method may require additional configuration in Exchange Online.
To set up a SMTP relay, go to the EAC and select Add Connector. Provide a name for the connector and select Next. You can also choose whether to enable logging and whether or not to allow anonymous access. Once the connector is created, you can verify that the connections are successful by navigating to the Event Viewer. If you encounter any problems, contact your network administrator for assistance.
…